
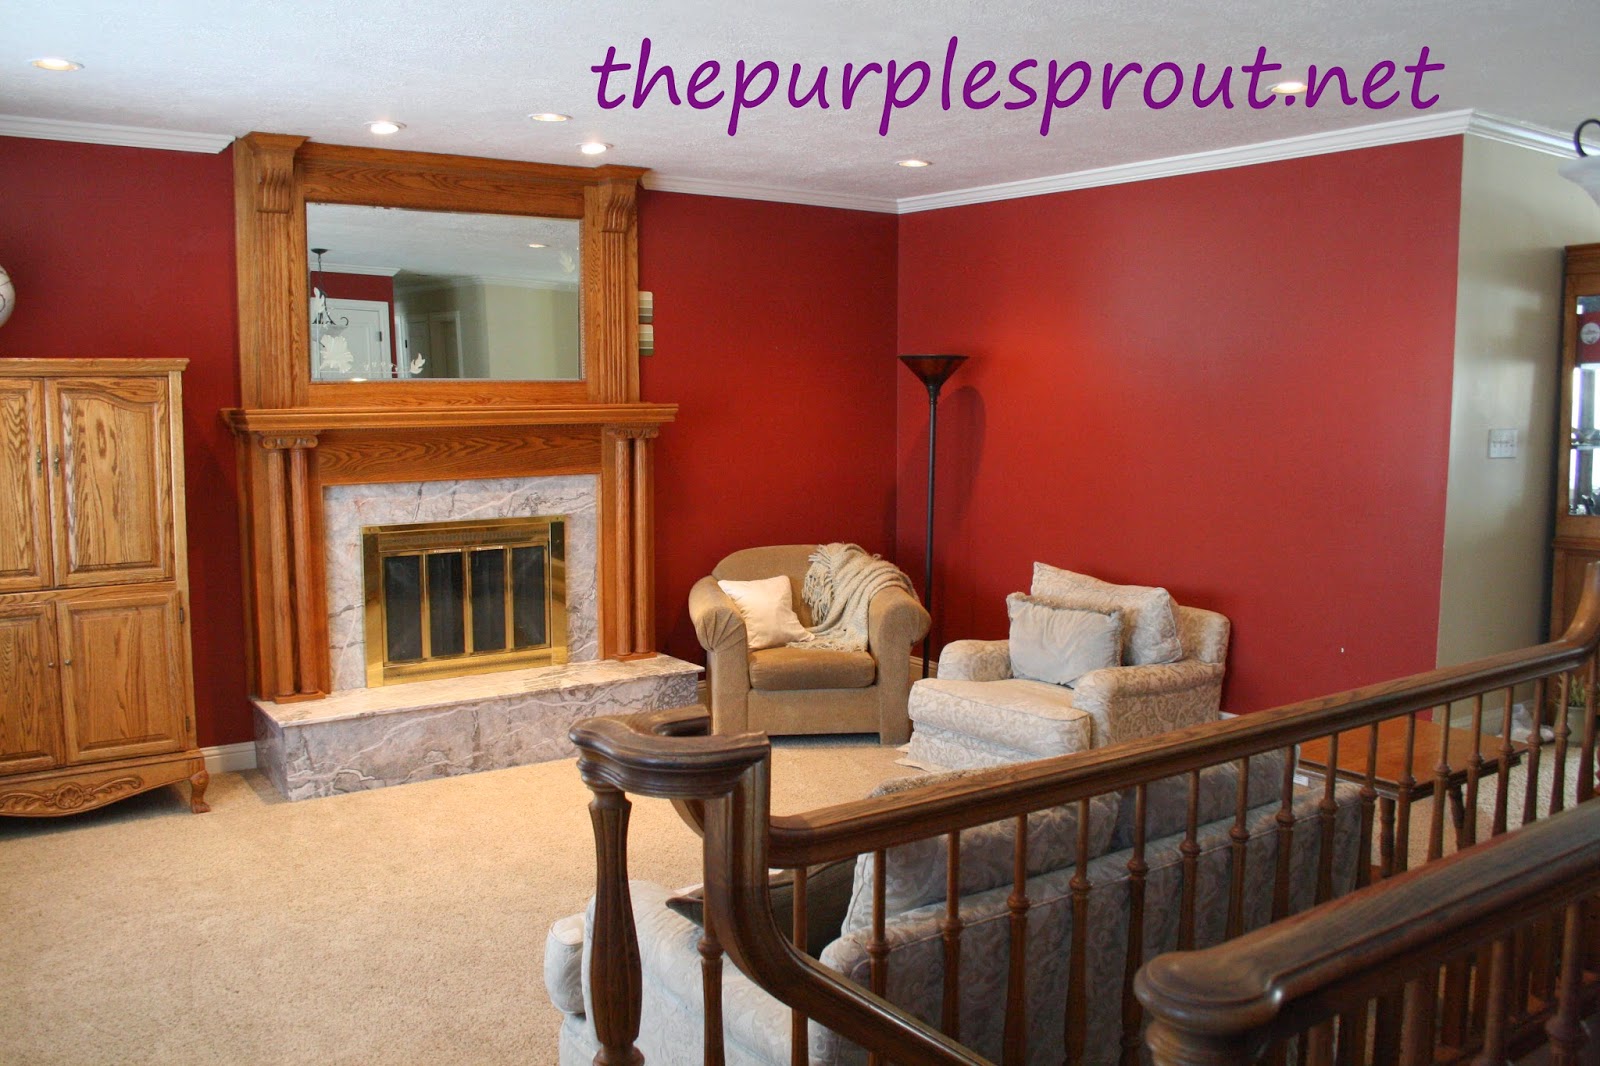

I loved the color, but this room felt rather dark most of the day (and especially at night).

I wanted to paint it a springy green, but it took me a couple of years to get around to it, as I was busy with other house/yard projects.

When I finally was able to paint it the springy green I wanted (the color of paint is actually called Ginger Root). It was so much brighter. Seriously, I remember being shocked at just how much brighter it was. I threw a bit of color in here and there, especially red. But, even with it being brighter, this room still didn't feel like it was mine.

I accumulated some more vintage/antique suitcases, a few of them even belonged to Aaron's grandparents.
Did I mention how much I LOVE vintage luggage?
Did I mention how much I LOVE vintage luggage?
For years, I had kept the pottery that my late brother, Joshie, had made in high school, tucked away in a box.....I didn't want it to get broken. But I also never got to look at it, to enjoy it's simplicity or the aesthetic pleasure it brings to me. I finally threw caution to the wind and put it up on the mantle.
Even with these adjustments, this room still just felt so drab to me.

A couple of years ago, I added some fresh orange and red California poppies to Joshie's vase and put a sled from my mother in law's childhood up on the wall. We gave away most of our beaten-up furniture, and found this amazing black vinyl sofa from the 50's online for a steal of a deal!

The new sofa was a tight squeeze into our front parlor, but now we could all be seated as a family. The extra seating was especially nice for when we had guests over. I bought a new rug that year, thrilled to finally have a little more décor.


This past fall, my sweet friend, Kelli (with Touch of Grey Photography), took our family pictures for us. Kelli is an amazing photographer, who has a talent for spotlighting your personality, through her work. I fell in love with this image....it shares our family's personality so perfectly! It just feels so real. Simon squeezing his arms around my neck so, so tightly....Ryan pulling at the bark on the log....Luken's sly pose...it is totally our family! For the photo shoot, I tried to stick with neutral colors (to match our parlor colors), but still felt compelled to use a little violet, mustard, and turquoise in there. I was worried that the image I adored so much, would clash with my neutral color scheme.....but I knew it needed to be up on our wall.

I wanted to have our family portrait blown up to hang on the wall. I needed a frame larger than I normally have lying around. I began pricing them out and couldn't find a frame to fit a 20x30 (which I think is the best size to order, if you want to keep the image as complete as possible, without having it cropped). I was anxious because I wanted to hang the picture up on the wall ASAP, but I knew I didn't have $200 to spend on a custom-made frame.
Being the frugal gal I am (or like to think I am), I found this frame from a thrift store for $10 and was thrilled because it would work perfectly with a 20x30 print. Seriously, how awesome is that?

I took off the canvas and the hardware/wiring, so I can use it on the back of the map that I had made for the newly-redecorated Neverland. Someone (but not any of MY kids, because they would never do a thing like that) knocked it off the wall a few too many times and the picture hangers need to be replaced.
I took the empty frame and painted it to look like rustic wood, leaving the inner matte framing a cream color. Then, I used some modge podge to attach the print to some thin board (I want to call it Masonite, but don't think that is what it is) and put the print inside the frame. Anyways, you'll get to see the finished results in a few more minutes...
When I got the photo up on the wall, I could see that the colors weren't going to go well with my current color scheme, I finally decided to give into my Bohemian. Hippie. Eclectic. Love.
I finally allowed there to be color, color, and more color in my parlor.
I finally allowed there to be color, color, and more color in my parlor.
Thus, began my journey to create Terabithia.

I decided that the first step would be to get a different rug. After a few days of searching, without luck, I just about fell over laughing when I had an epiphany. Doh! Why would I buy a $100 rug that anyone else could have, when I could make a unique, one-of-a-kind, just-my-style rug for $100 in materials? After all, it is a huge part of what I do for a living with our family business, Gypsy Essentials! I began working on my rug.
It took me a few weeks of crocheting (over 30 hours, to be exact, and it was a monster to crochet....anyone who says crocheting a 6' diameter rug isn't difficult is full. of. it.) and I used up around 20 bed sheets in the process, but I finally had a rug that sang my tune. I still grin every time I watch my little ones, running in circles around the outside. So happy to see something so simple bring so much joy to them. Such a fun Gypsy Mat!


They are all woven tenderly together into our "rainbow circle" (at least that is what the kids call our rug, when we finish our morning devotional, gather together, and hold hands in a circle, to pray).

Once the rug was complete, I figured that if I was going to finally have this room the way I wanted it to be, I would need to have some equally remarkable throw pillows....and lots of them! We love pillows at our house. AND we use them. They can't just be decorative fluff, they need to be functional, as well. That being the case, I knew that I wanted to have inexpensive pillows that I could remove the covers and wash. Because, inevitably (no matter how many times I
I went to the craft/fabric stores to price out pillow forms and about fell over when I saw that they ran around $5 a piece. I searched the thrift stores for pillows that were firm, didn't smell, and that were the right size. Surprisingly, I even found a couple of new pillows (tags still on them) for $2, during my search. I also used all of my pillows-of-decorating-past, that I had been trying to figure out a use for. I used my most favorite fabrics (some of which I had used in Neverland) to make the 12 that I sewed covers for (but I didn't use any of my batiks, because I am saving those for my bus décor, to match the curtains I already sewed a few years ago).
I used Velcro because it was easy and inexpensive. And I have been pleasantly surprised by how well it has stayed together. And because the covers are removable and the insides were so inexpensive, I am a much more relaxed mama.

I give you our beloved retro, vinyl sofa, filled to the brim with my Bohemian-hippie pillows, just dying to have someone snuggle up with them.
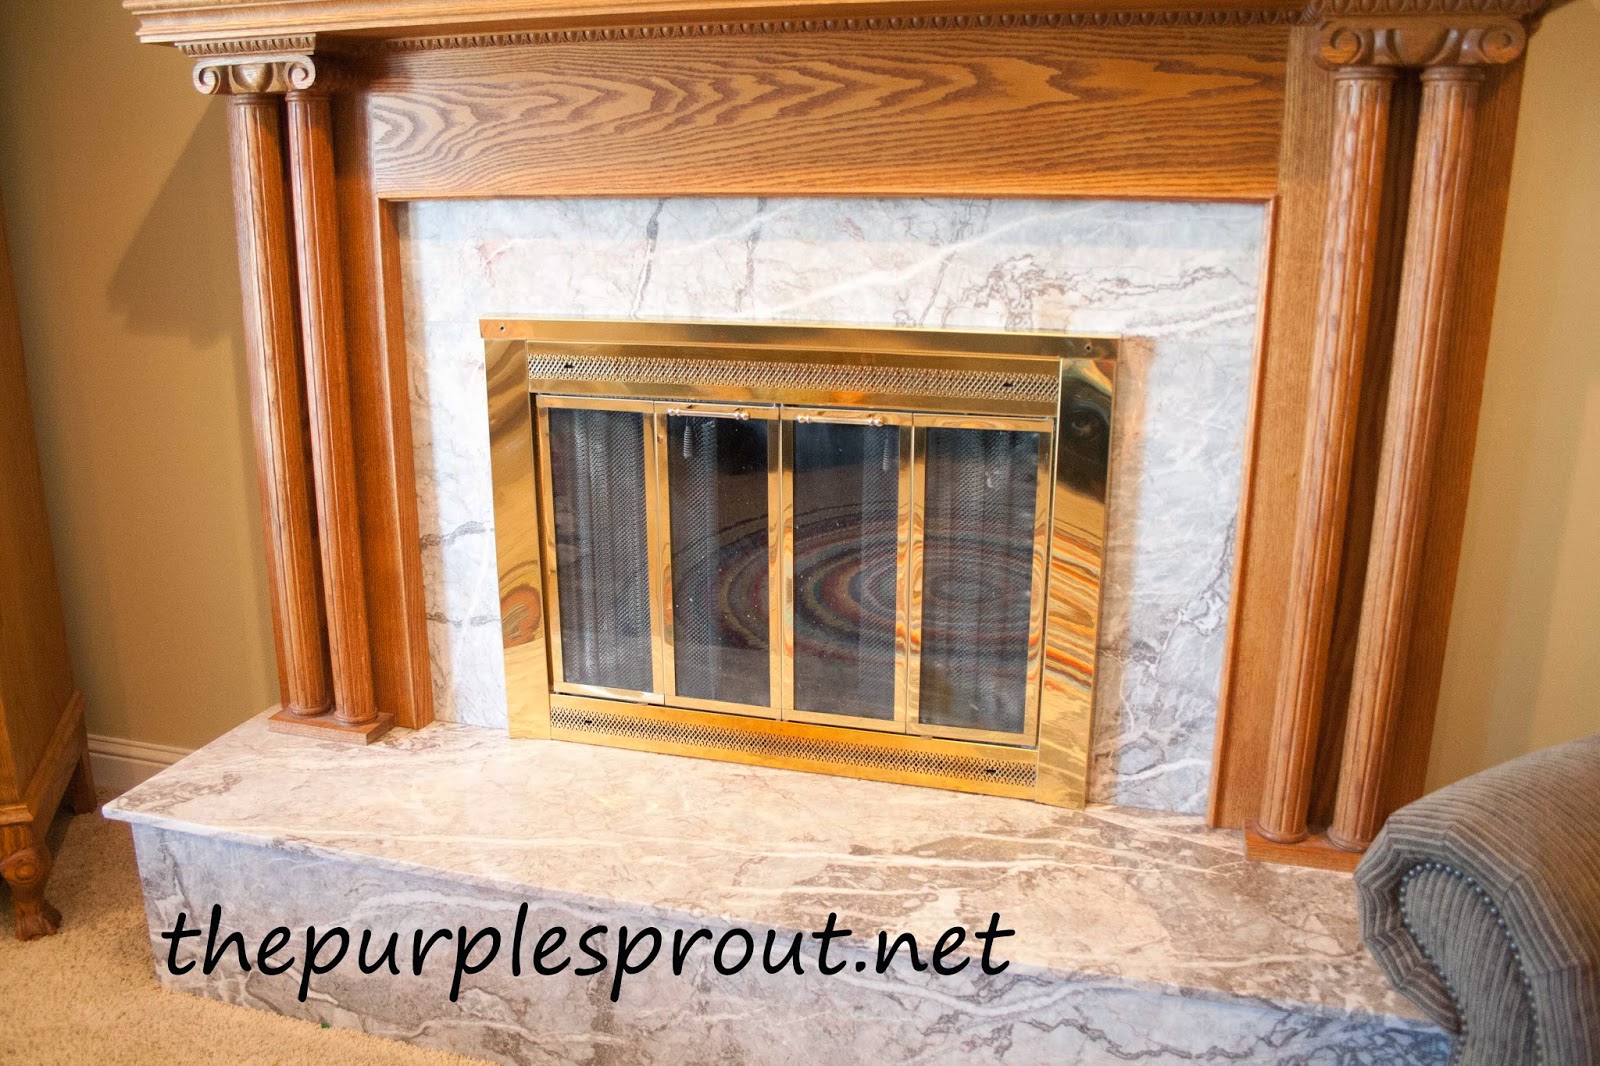
The next item on my list took me a few weeks to come to terms with. I absolutely loathe shiny brass/gold fixtures. Even gold-plated (despite it's worth) seems so gaudy to me. I have always hated (yep, you heard me. hated) this fireplace cover. It was a gas fireplace when we first moved in and we had it converted back to wood-burning a few years ago (which was a blessing, when we had a huge windstorm knock our power out for 1.5 days a couple years ago). I love using this fireplace and I appreciate the great craftsmanship that went into this mantle. But I couldn't stand that brass!
I was going to spray paint it (even purchased the spray), but I just couldn't get over the idea of having the off-spray all over my house, despite others telling me it would be fine. I took back the spray and got a can of black, high-heat paint.

I taped it off....then realized that I probably needed to scuff it up good, before painting.

I sanded, then wiped her down.

Put one coat on....

2 coats on....

Then a third coat, for good measure. All of this was done over a couple days time. I want this paint to adhere well.

I even washed the inside of the glass....I think it was the 2nd time since we have lived here that I did this. What can I say? I really didn't find it at all appealing, clean or dirty. Now, I absolutely love it! And I only used up around $1.50 worth of the paint. I decided to use some of the paint on my weathered, black mailbox (it looked like someone had dumped bleach over the top of it). Now it looks brand new!

Remember that thrift-store frame? I am so delighted with the results!
And above our family portrait, you can see our family motto.
Our family song is Love At Home. The second verse of Love at Home is my personal favorite:
In the cottage, there is joy.....when there's love at home. Hate and envy never annoy.....when there's love at home. Roses bloom beneath our feet; all the earth's a garden sweet, making life a bliss complete....when there's love at home.
So, it seemed only fitting that our family motto would be Making life a Bliss Complete!

I was going to make the vinyl for our family motto myself, but when I saw an adorable image on one of my friend's buses, I knew I needed that font for my wall.....and I couldn't find the font anywhere. I asked my friend, Amy, where she had gotten her vinyl from and she said her sister, Amanda, had made if for her. She gave me the link to Amanda's etsy store, BushCreative. Amanda made it EXACTLY the way I wanted it. It was mailed out quickly and there was even a tutorial online to help those who have never hung vinyl before. So impressed!
I was thrilled to finally have our family motto up on our wall!
This room was finally beginning to really feel like home to me....after 6 years of living here.

This armoire/entertainment cabinet was left by the previous owners. It is extremely heavy (as are most solid-wood pieces of furniture. It had a broken door, when we first inherited it. But I glued that door back on....only to have Ryan hang on the other bottom door and break it off. After gluing that door on, it sat for many years....while I tried to figure out what color to paint it. I was going to paint it red, but then I ended up painting the armoire in Neverland red, so I decided that this one would be a very pale blue. I also wanted to change the shade of the hardware. It wasn't as shiny as the fireplace cover, but I wasn't fond of it, either. And since most of the hardware at Blossom Cottage is oil rubbed bronze, I figured, why not change it up?

I love the curvature and detail in the bottom of this piece, I have never really been a fan of oak.
In fact, I would have to say it is my least favorite type of wood.
But I knew that this piece would look lovely, once I was able to paint it to match my personality.

I applied a couple coats of some Frosty Lake paint in egg shell, making sure to keep some of the armoire looking worn and aged. Then I sprayed the hardware (took it outside, of course) with a couple coats of a special paint meant to adhere to metal. So far, it has held its own. Which thrills me to the bone, because I plan on using that same paint to cover the 54 handles in our kitchen/mudroom in my next project.....getting revved up for that one!

I love the details of this beauty. So thankful that our friends left it with us.
I plan on keeping it for many, many years to come.

Terabithia is where we meet in the morning to have devotional & prayer. Terabithia is where I help mentor our little scholars. Terabithia is where we all hang out and converse for much of the day. Terabithia is where we all meet again, each evening, for family scripture & prayer. To say it is a well-used room, is an understatement.
And when family comes over, we all migrate into this tiny room. So, one of my goals has been to make it as comfortable as possible for everyone. And to have as much seating as possible. That is why I decided to create a cushion for the hard, cold, marble hearth. I was going to purchase a new piece of foam and make one solid piece. But rather than spend between $35-$70, I decided to improvise with what I already had lying around.
I remembered that I had a couple of extra cushions from our many adventures of rummaging through wrecked/decommissioned RVs, when we were creating Liahona. I pulled out a couple of the cushions and, sure enough, they fit perfectly on the hearth (give or take a few inches). Yes!!
I had already picked out the fabric I planned to use. It is actually drapery fabric that I found at a local yardsale last summer. I instantly fell in love with the fabric and a vintage suitcase they were selling, as well. For the entire bolt of fabric and the suitcase, I spent $20. One of my best yard sale finds, to date!

I spent a few evenings, researching on how to sew cushions with piping and was gearing up to do it. But I decided, last minute, to sew some simple slip covers that tuck into the sides (like I did for the cushions downstairs, in Neverland). What can I say? I like to keep it simple, when I can. And now we can comfortably fit around 12-13 people in this room, without bringing any other furniture in.
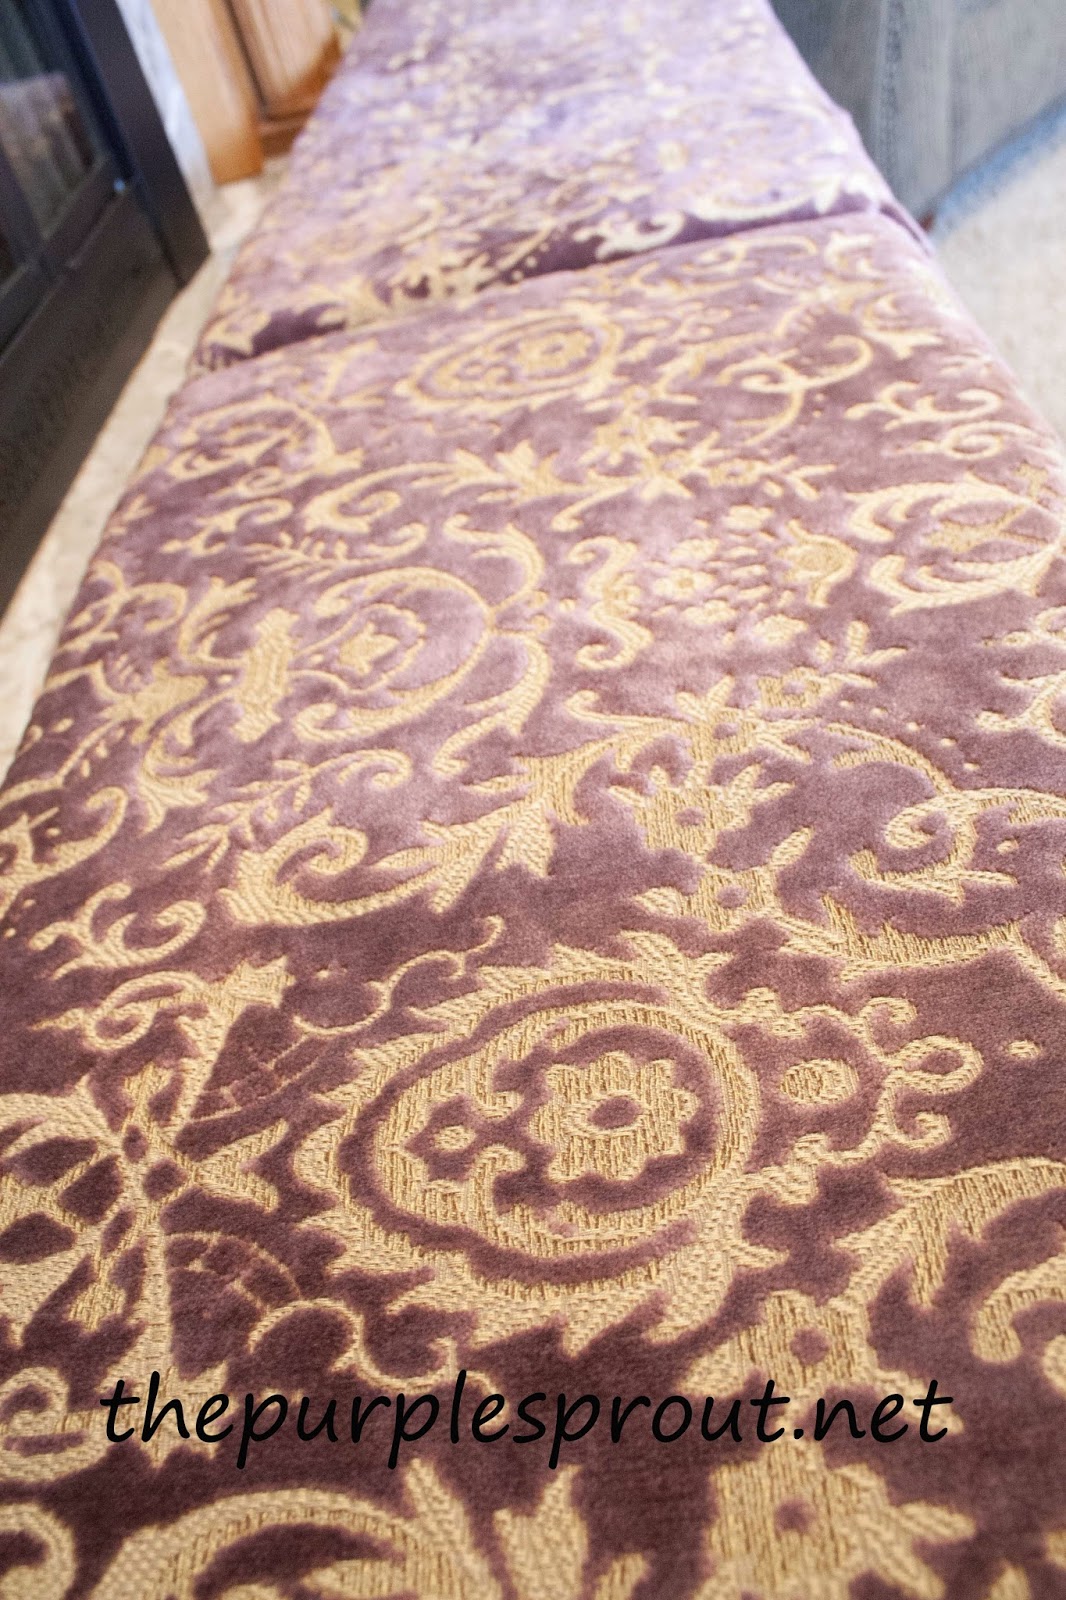
Love this fabric, so plush and full of texture....love to just run my
hand across it, when I am near.

After we donated our old loveseat to a fundraising-yardsale, last summer, Aaron and I didn't have anyplace comfortable to sit together in this room....and that made me sad. For several months, I searched online, for a loveseat that was in good shape and was within my budget ($150). Then, one day, I came across this sofa for $75. I still can't believe a loveseat this amazing was at such a great price. It looks and smells brand new. We are so blessed!
And the cute little pillow with the embroidered flowers? From a thrift store. For $2.

Once I had the hearth cushions completed, I knew I had to make a difficult decision....involving this beautiful fireplace. I mentioned I am not a fan of oak. Well, I especially can't stand this color of stain on oak. While I have always adored the beauty of the workmanship involved with this fireplace mantle, I have also had a yearning for it to be a different color. I would love to do a distressed white/cream on this fireplace. I know, some of you are shrieking, "You can't paint over beautiful wood!" And that is why it has never been painted....and probably never will. As much as I would love to lighten the room up and give it that last bit of my touch, I just can't bring myself to cover up this extraordinary artwork.

Just look at this! They simply do not make fireplace mantles like this anymore.
Well, not without paying a fortune.

So, while there will always be a part of me that feels like I need to paint/distress our fireplace. There is also a part of me that sees the true beauty within and chooses to leave it as is.....for now, at least.
I am still thinking about applying stone over the marble. I LOVE stone and I like marble as much as I like oak and shiny brass. LOL But that will be a project for another year, if it ever happens.

I miss this antique gossip bench....sold it a couple days ago to an antiques dealer. But, it wasn't of any sentimental value (it was from a yardsale) and there was way too much fighting over who could sit in it, when it was in Terabithia. With the money from the bench, I am now going to be able to move forward with my next project (the kitchen).
Can you tell I am getting excited to begin?
Can you tell I am getting excited to begin?
And do you see the chair under the window? I used a vintage blanket, complete with pom-pom ruffle, to throw over the chair. The blanket was another yardsale deal. Paid $2 for this one.

If you came to visit us at Blossom Cottage, this is what you would see....
A sled on the wall to remind us that all of our parents were once young and wild at heart.
A vase of forced bulbs on top of books, to remind us to always be willing to try new things and seek knowledge (this was my first year ever trying to force bulbs....so rewarding!).
A beautiful portrait of the most precious gift we have, our family.
Our family motto, to remind us that life can be a Bliss Complete, if we all work towards creating Love in our home.

The world and some luggage, high upon a shelf, reminding us of our previous & future adventures around the world and all of the other dreams that sometimes seem unattainable (but you need only grab a chair to reach them).
A heart-shaped basket of yarn, reminding us that we can create whatever we want, whenever we want, we need only reach within our heart to begin.

And Joshie's vase, showcased on the mantle, symbolizing courage when faced with great fear (fear, only because I am still a little afraid that I will come home to a broken vase someday, despite constant, daily reminders not to throw anything in this room....) and also to remind us that death comes like a thief in the night for some. We can't take life for granted, especially the time we have with loved ones. Both are far too precious.
Enjoy the beauties life holds, while you can!
~.~ the purple sprout
p.s. Here are some before and after shots for fun. This project was more emotional than monumental for me. But it was a journey which I loved every minute of. Enjoy YOUR journey!


